|
Routines |
| Prev: C1DB | Up: Map | Next: C28A |
|
Used by the routines at StartGame and UpdateThrownItem.
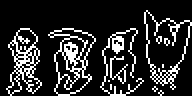
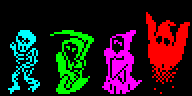
Draws the icons of the four monsters in the status panel. The icon of a monster that is still alive is drawn as a plain shape. The icon of a monster that has been killed is drawn with all of its detail, in the colour of the monster.
|
||||||||
| DrawMonsterIcons | C1FD | LD IY,$BD5E | Start with the first monster. | |||||
| C201 | LD DE,$57EF | Set the screen address of the bottom row of the first icon to 57EF (in the screen buffer). | ||||||
| C204 | LD B,$04 | Set a counter for the four monsters. | ||||||
| DrawMonsterIcons_Loop | C206 | PUSH BC | Keep the counter and the screen address. | |||||
| C207 | PUSH DE | |||||||
| C208 | LD A,B | Work out the type of the first frame of this monster's sprite (6C, 68, 64 or 60). | ||||||
| C209 | ADD A,A | |||||||
| C20A | ADD A,A | |||||||
| C20B | ADD A,$5C | |||||||
| C20D | LD BC,$6E9E | Point at the table of sprite addresses. | ||||||
| C210 | CALL GetTableEntry | Find the address of the sprite in the table. | ||||||
| C213 | EX DE,HL | Swap the sprite address and the screen address over. | ||||||
| C214 | LD A,(DE) | Check whether the sprite is stored flipped (bit 6 of its first byte). | ||||||
| C215 | AND $40 | |||||||
| C217 | PUSH BC | Keep the registers safe. | ||||||
| C218 | PUSH HL | |||||||
| C219 | CALL NZ,MirrorSprite | Flip the sprite back to its normal way round if it is flipped. | ||||||
| C21C | POP HL | Get the registers back. | ||||||
| C21D | POP BC | |||||||
| C21E | EX DE,HL | Swap the sprite address and the screen address over again. | ||||||
| C21F | LD A,(HL) | Fetch the width of the sprite in bytes. | ||||||
| C220 | INC HL | |||||||
| C221 | AND $3F | |||||||
| C223 | LD B,A | |||||||
| C224 | LD C,(HL) | Fetch the height of the sprite in rows. | ||||||
| C225 | INC HL | |||||||
| C226 | LD A,(IY+$00) | Check whether the monster has been killed, and jump to DrawMonsterIcons_DeadRow if it has. | ||||||
| C229 | SUB $60 | |||||||
| C22B | CP $10 | |||||||
| C22D | JR NC,DrawMonsterIcons_DeadRow | |||||||
| DrawMonsterIcons_AliveRow | C22F | PUSH BC | Keep the width and the screen address of the row. | |||||
| C230 | PUSH DE | |||||||
| DrawMonsterIcons_AliveByte | C231 | LD A,(HL) | Draw a byte of the row as the plain shape of the sprite, and loop back until the whole row has been drawn. | |||||
| C232 | INC HL | |||||||
| C233 | CPL | |||||||
| C234 | OR (HL) | |||||||
| C235 | INC HL | |||||||
| C236 | CPL | |||||||
| C237 | LD (DE),A | |||||||
| C238 | INC E | |||||||
| C239 | DJNZ DrawMonsterIcons_AliveByte | |||||||
| C23B | POP DE | Get the width and the screen address of the row back. | ||||||
| C23C | POP BC | |||||||
| C23D | CALL ScreenPosition1PixelAbove | Move up to the row above. | ||||||
| C240 | DEC C | Loop back until every row of the icon has been drawn. | ||||||
| C241 | JR NZ,DrawMonsterIcons_AliveRow | |||||||
| DrawMonsterIcons_Next | C243 | POP DE | Get the counter and the screen address back. | |||||
| C244 | POP BC | |||||||
| C245 | INC E | Move on by three characters, to the place for the next icon. | ||||||
| C246 | INC E | |||||||
| C247 | INC E | |||||||
| C248 | PUSH DE | Move on to the next monster. | ||||||
| C249 | LD DE,$0010 | |||||||
| C24C | ADD IY,DE | |||||||
| C24E | POP DE | |||||||
| C24F | DJNZ DrawMonsterIcons_Loop | Loop back until the icons of all four monsters have been drawn. | ||||||
| C251 | RET | Return. | ||||||
|
The monster has been killed, so draw its full pixel image.
|
||||||||
| DrawMonsterIcons_DeadRow | C252 | PUSH BC | Keep the width and the screen address of the row. | |||||
| C253 | PUSH DE | |||||||
| DrawMonsterIcons_DeadByte | C254 | INC HL | Draw a byte of the row from the full pixel image of the sprite, and loop back until the whole row has been drawn. | |||||
| C255 | LD A,(HL) | |||||||
| C256 | INC HL | |||||||
| C257 | LD (DE),A | |||||||
| C258 | INC E | |||||||
| C259 | DJNZ DrawMonsterIcons_DeadByte | |||||||
| C25B | POP DE | Get the width and the screen address of the row back. | ||||||
| C25C | POP BC | |||||||
| C25D | CALL ScreenPosition1PixelAbove | Move up to the row above. | ||||||
| C260 | DEC C | Loop back until every row of the icon has been drawn. | ||||||
| C261 | JR NZ,DrawMonsterIcons_DeadRow | |||||||
|
Colour the icon with the colour of the monster.
|
||||||||
| C263 | POP DE | Get the counter and the screen address back, and keep them for the next icon. | ||||||
| C264 | POP BC | |||||||
| C265 | PUSH BC | |||||||
| C266 | PUSH DE | |||||||
| C267 | LD A,B | Look up the colour of the monster. | ||||||
| C268 | LD HL,$C52F | |||||||
| C26B | CALL AddAToHL | |||||||
| C26E | LD C,(HL) | Keep the colour. | ||||||
| C26F | EX DE,HL | Get the screen address of the icon. | ||||||
| C270 | LD A,H | Work out the address of the matching attribute. | ||||||
| C271 | RRCA | |||||||
| C272 | RRCA | |||||||
| C273 | RRCA | |||||||
| C274 | AND $03 | |||||||
| C276 | LD H,A | |||||||
| C277 | LD DE,$5800 | Add 5800 (in the attribute buffer). | ||||||
| C27A | ADD HL,DE | |||||||
| C27B | LD DE,$FFDE | Set the distance from one row of attributes to the row above. | ||||||
| C27E | LD B,$06 | Set a counter for the six rows of the icon. | ||||||
| DrawMonsterIcons_Colour | C280 | LD (HL),C | Colour the three attributes of a row of the icon, and loop back until all six rows have been coloured. | |||||
| C281 | INC L | |||||||
| C282 | LD (HL),C | |||||||
| C283 | INC L | |||||||
| C284 | LD (HL),C | |||||||
| C285 | ADD HL,DE | |||||||
| C286 | DJNZ DrawMonsterIcons_Colour | |||||||
| C288 | JR DrawMonsterIcons_Next | Jump to DrawMonsterIcons_Next to move on to the next icon. | ||||||
| Prev: C1DB | Up: Map | Next: C28A |